Updating & Setting Color Rules
(Learn how to adjust the colors of activities on your calendar.
Assigning colors to activities is a great way to visually group similar activity types. For example, you can assign emails to blue or paid social to red or activities that are email and paid social to purple. Colors can be set manually or you can create color rules to auto assign colors in any way that works for your company.
Manually Updating Colors
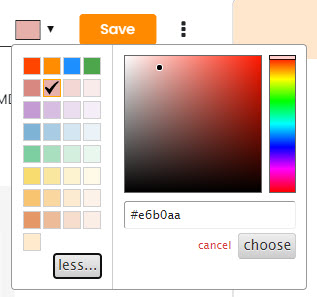
When a new activity is added, a color selector appears to the right of the activity name. By default, a new color will be assigned to the activity automatically, rotating through available colors.
If you would like to change the color from the default, simply select a new color from the selector:

Using Color Rules to Assign Colors
But even better, you can set up color rules to automatically set colors based on the filters assigned to activities. In order to use color rules, you have to first set up labels.
To illustrate how rules can be set up, let’s use an apparel retailer client as an example. Their marketing includes promotions, new product arrivals, fashion stories and general messaging.
In addition to marketing messages, they also track home page updates (for marketing message changes) and their photo shoots for new content creation.
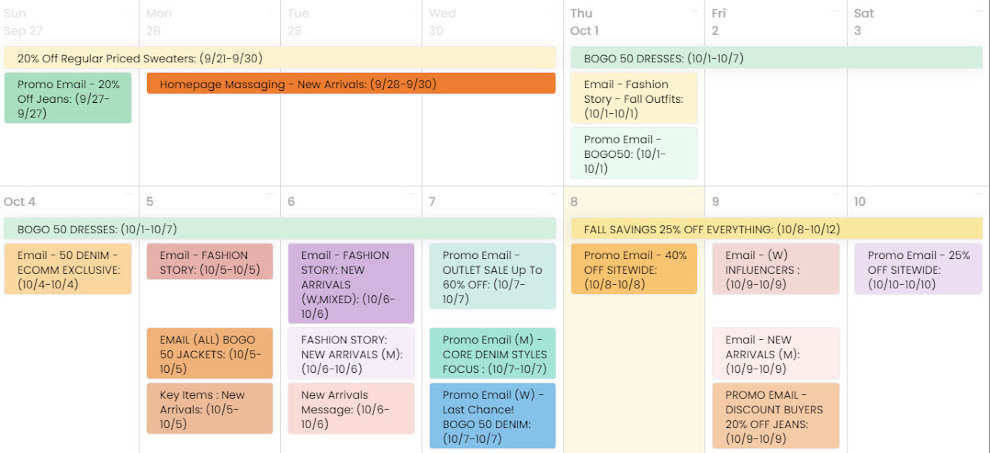
Here is a look at their calendar before rules are applied (kind of messy, right?):

To provide better visual organization to the calendar, we can set color rules to activity types to help group them all together.
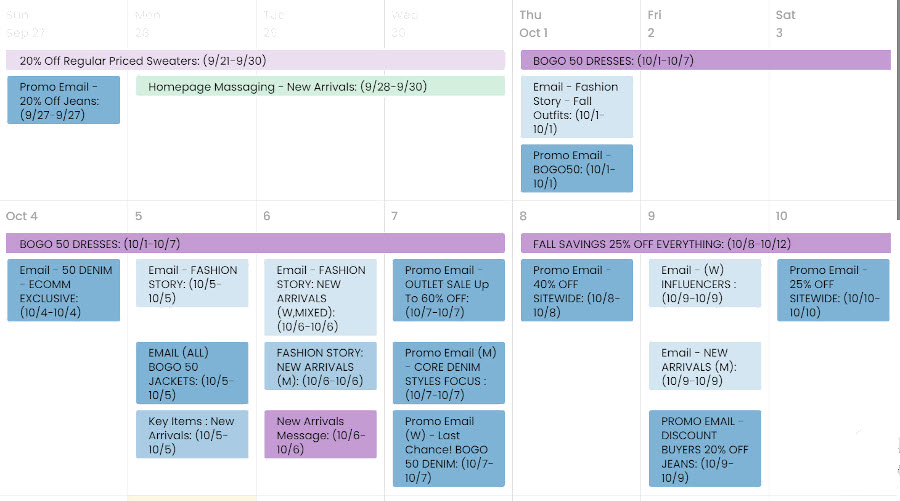
Here are the rules that will be applied – notice similar activity types (ie: email) are using the same color family:
- Email + Promo = Blue
- Email + New Arrivals = Medium Blue
- Email + Fashion Stories = Light Blue
- Home Page Update = Pale Green
- Photo Shoot = Pale Yellow
- Paid Social, Paid Search, Display = Medium Purple
- Affiliate = Pale Purple
And…this is how their calendar looks after establishing color rules (aahh, that is much better!):

So, how do you get color rules set up for your calendar?
Step 1: Go to Account Setup > Filter Groups and select : ![]()
Step 2: To turn add color rules, select YES which will give you the option to select filters that will be used to create a rule.

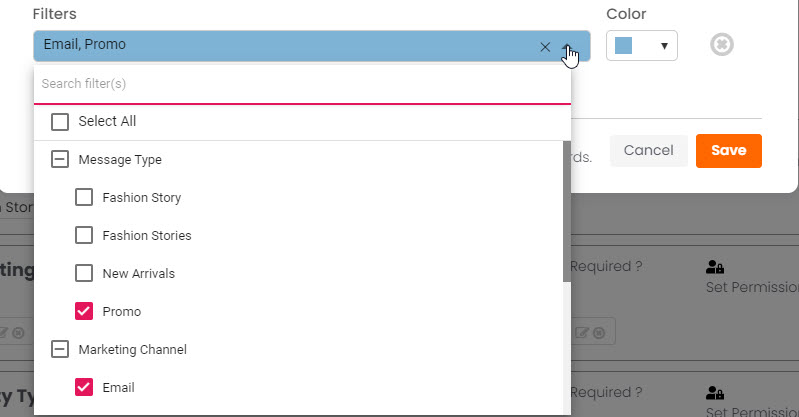
Step 3: Select the filter(s) you want to include in the rule, then select a color.

Step 4: Click +NEW to add a new rule, select new attribute(s) and select a color:

It’s that simple – when you hit SAVE all activities in your calendar will be updated to match the new rules.
A few caveats to color rules…
The logic behind setting up color rules is pretty complicated on the backend (we won’t go into how challenging this update was), but in order to allow for as much flexibility as possible, there will be times where rule conflicts occur.
For instance, let’s say you have these rules set up:
- Email + Promo = Blue
- Email + New Arrivals = Medium Blue
Caveat 1: If you have an activity for Email + Promo + Paid Social, there is no rule for this exact filter assignment, but there is a rule for Email + Promo, so the activity will be blue, since it is the best rule match. This will happen frequently, because you won’t likely (and really shouldn’t need to) have rules set up for every possible scenario.
Caveat 2: If you have an activity that is assigned to Email + Promo + New Arrivals, this matches both rules, which causes a conflict. When this happens, a default color will be assigned, ignoring both rules. Colors can can always be changed manually, so you can adjust to an appropriate color if a color conflict occurs.
Turning Off Color Rules
If you no longer want to use color rules, you can turn them off.
Step 1: Go to Account Setup > Filter Groups and select “Set color rules”.
Step 2: Select “No” and click SAVE
Color rules will still be saved in case you want to turn them on again in the future. Select “Yes” to see how the rules are set.
Colors assigned to existing activities will not be impacted, but any new activities added will no longer use the color rules.